


[the_ad_placement id=”top-content-300×250″]
Continuing our Sound Design series, in Part 3 we are digging into the concept of layering pieces of audio together to create richer, more detailed and more impactful sounds.
It’s quite a simple concept in principle, but as with many aspects of music production and sound design, it can help to approach it in the right way with some key knowledge, and with the right tools that will make your life easier and more creative when working with layers. Let’s get into it.
Catch up on the other parts in the series:
- Part 1 – Delay
- Part 2 – Distortion
- Part 3 – Layering
- Part 4 – Classic Modulation FX
- Part 5 – Stereo & Panning FX
- Part 6 – Pitch Shifting
- Part 7 – Reverb
- Part 8 – Step Sequencers & Envelope Generators
- Part 9 – Creative Filtering
- Part 10 – Granular Synthesis & Sample Processing
Part 3: Layering In Sound Design
A fairly open secret of professional sound design is that layering is pretty much the key to creating distinctive, powerful, alive-sounding audio effects. But what exactly do we mean by “layering”, and why is it an effective technique?
Layering is essentially about arranging several separate sounds together, in such a way that when played back together the overall effect is of a single complete sound.
Each layer will ideally occupy its own range of frequencies, and contribute some sonic characteristics that are not present in the other layers: for example, layering a hard digital hit sound with an abrupt, punchy transient with a softer but pleasingly acoustic-sounding mid-range thump can give you a percussion hit sample with the best of both worlds: evocative character and impressive weight.
As we touched on in the previous article on distortion in sound design, it’s helpful for any producer, but particularly those designing their own sounds, to develop the habit of hearing drums and synth sounds as made up of several discreet parts, each occupying their own frequency range and with their own envelope characteristics (or put in simple terms, each with their own shape and timing). When you put together a sub boom, a low-mid range thump and a mid-high frequency thwack or tick, you get a typical basic kick drum sound, for example.
Why is all this useful? As sound designers, working in terms of layers means we can exercise complete control over each component part of a sound, much as we aim to do with a full mix. In fact, layering could be thought of as a micro version of what we do on an overall, macro scale when arranging and mixing a complete song. We have the power to shape, twist and sculpt it in almost any way we choose. The end listener will only hear the final layered sound as a (hopefully) unified, focused sound object: effective sound design is a kind of sonic wizardry, you’re stacking a combination of simple but subtle techniques and sounds, knowledge of psychoacoustic principles and pure creativity in your source choices and way that you frame your sounds within a full track, to sell a powerful illusion.
Of course, you don’t have to stop at only two layers. With the multi-track capabilities of all modern DAWs and audio programs limited only by the processing power of the computer they are running on, you can take layering to ridiculous extremes. Just think about why you’re adding additional layers, what you’re aiming to gain, and be aware of some of the pitfalls. We’ve outlined some key considerations and tips for effective layering in sound design below.
Designing Layered Drums
Drums and other similarly shaped “impact” sounds are the prime arena in which to explore layering to build your own personalized kits and effects hits, that have an original character and still hit the proverbial “correct” frequency points (where they need to) in a full, well-produced modern mix.
Sometimes it’s helpful to think of each layer in a drum sound fulfilling the role of each stage in an ADSR envelope: one sample contributes the Attack, another the
Remember that pitch in drum sounds is subtle but can make a big difference both in how well a drum sound sits in a kit or mix, and in how effectively the drum layers mesh together. Generally, try to find drums that layer together well without too much pitching up or down to make them fit: in tuning them too far away from their original pitch, you’ll likely smear transients or lose the texture or definition that was the reason for your selection in the first place.
Of course, you can take pitching to extremes for sound design purposes, and turn kicks and snares into interesting tom and hat layers by pitching them up a couple of full octaves, or vice versa.
You can use filters and EQ to chop out certain frequencies to isolate the part you want to layer with something else, but beware of a common side effect of filtering in layering to produce a rather thin-sounding overall sound. Of course, any sound can be layered with another, but the overall advice is, selecting sounds that already sound great together generally wins over spending much time and effort trying to force sounds into a “natural-sounding” composite. With practice, you soon develop an ear for what has immediate potential – and what ends up sounding best is not always what you would necessarily think. This is one reason why it’s so important to have plugin tools on hand that allow very rapid auditioning of different layer combinations, and ideally that also have some level of randomization options, which we’ll get into with our layering plugins roundup below.
Keep Each Layer In Its Own Discreet Frequency Range
When layering sounds, it’s best to keep each layer within its own considered frequency range. Layering won’t really work super-effectively if any two sounds occupy too many of the same frequencies: they can reinforce each other, which you might want if you know what you’re doing, but you’re more likely to end up with odd lumps in volume at crossover frequencies, frequency masking (where you just won’t hear the weaker sound underneath the stronger one), and possibly phase cancellation issues that could make the final sound weaker, wispier or muddier. Of course some overlap is alright and might be effective in small doses to ensure the overall sound feels like it is in fact a cohesive sound rather than separate layers, just know what to be wary of and the dangers are relatively easily avoided.
For example, let’s say you have a pad made up of two mid-range layers that has some great movement as each layer has its own modulation rate and depth for its effects. But the sound is a bit dark and gloomy, and you are going for something more crisp and upfront. While there are several ways you could process the existing layers — with EQ, or with distortion to add some upper harmonics and presence — you could instead simply add a whole other higher-frequency sound to your composite pad that provides whatever flavour of bite, fizz, noise, crackle or airiness you require. In this sense, layering bridges the areas of sound design, arrangement and mixing: once you’re accustomed to using it effectively, it can save you a lot of work that you might otherwise have put into processing or rewriting perfectly good parts.
Timing Each Layer
As well as thinking vertically, think of where each layer falls horizontally on the timeline too. With hits and impacts, if the transient or body portion of each layer falls at the same time, you will generally have a particularly loud and punchy hit as the sound fills so many frequencies simultaneously. Alternatively, staggering the abrupt attack/transient portions of each layer can give you a range of different effects, from nicely slurred hip hop claps to flammed snares to rhythmically stuttering glitch hits and buzzes, depending on the character of the layers and how wide you make the spacing between their transients or start times.
With longer layered sounds that last more than a second, you can think of your layers contributing to a complete “micro-arrangement”, where the final sound has a distinct beginning, middle and end. Or even multiple middles, there’s no limit to how twists and turns you can design into a layered sound. This is a typical approach in movie sound effects design and foley, where a “complete” sound effect moment is usually made up of a focus sound plus a whole family of supporting sounds. Think of a semi-automatic rifle being fired in an action scene: there’s the subtle foley noise of the shooter handling the grips and trigger; the click and punch of the initial explosion that propels the bullet; and then the echo or reverberation, or lack thereof, which indicates exactly what type and size of environment the scene is happening in.
There are some excellent effects plugins available that make layering not just easy but really fun and an inspiring source of unique composite sounds that you probably would never have thought to put together yourself. Several of the plugins featured below operate on the principle of controlled randomization: you define the parameters and range of sound/sample sources for the layers to be randomly selected from, and then you can gradually hone, process, replace or re-randomize each layer part until you arrive at a compelling composite sound object, whether its a drum hit, cinematic impact or melodic synth patch.
The Best Layering Effects Plugins For Sound Design: Roundup List
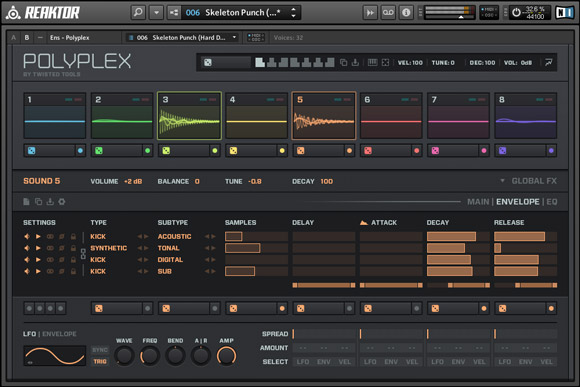
1) Native Instruments Polyplex
Polyplex is something of a drum sound designers dream as it fulfills the key requirement of helping generate truly unique sound combinations whilst also being incredibly fast and fun to use.
The plugin features 8 main polyphonic drum cells, with each cell containing up to 4 layers.
With its various tiers of randomising “dice” and fixing “lock” buttons, from global to individual cell to individual layer, you can build up your sounds through a satisfying process of iteration, keeping what you like and tweaking or rolling the dice again on parameters or layers that aren’t what you’re looking for. For us, it’s workflow sits right in that sweet spot that even many advanced plugins miss: triggering instant and surprising inspiration on the one hand, while still allowing you room to impose your own ideas to refine the results or set just how random you want to go.
While it comes with its own excellent 1.2 GB drum sound library, you can also load your own samples into a User bank from which Polyplex can draw it’s source layers. You can set up each cell to load anything from a handful of round-robin variants of a single sound, to making a random selection of drums and FX and letting it choose from a much broader range of sounds for truly surprising layered results, that can then be tweaked and refined with some well-thought-out editign and effects additions.
Polyplex was designed for Native Instruments by Twisted Tools, who also have their own sound design layering plugin which no doubt inspired and in part led to Polyplex, called S-Layer: check it out below.
Available for: Mac, PC | VST, AU, AAX
Polyplex can be bought separately and is also of course included in NI’s comprehensive Komplete 12 Ultimate Bundle, a great and fairly essential library of synths and effects processors for any sound designers toolbox.
[button link=”https://geni.us/ni-komplete12″ target=”_blank” preset=”blue” text_color=”#ffffff” color=”#238bcd”]BUY NOW[/button] via Amazon.
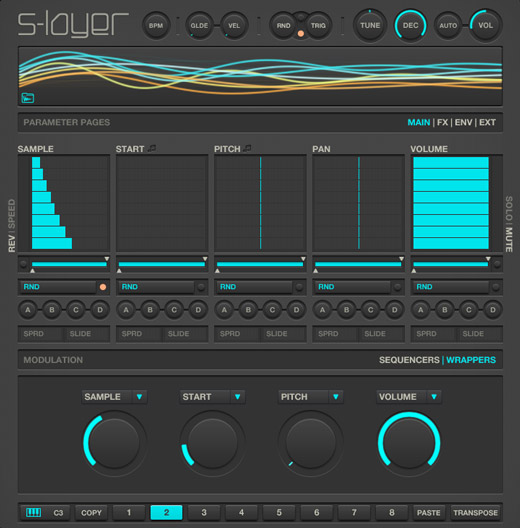
2) Twisted Tools S-Layer
Where Polyplex is designed for working with drum material arranged into simultaneously playable kits, effectively operating like a drum machine instrument, S-Layer doesn’t have the same kit functionality but goes deeper with the layering on a single focus sound. It has double the number of available layers per sound (eight as opposed to Polyplex’s four) and also has features like Transpose that can spread your single layered sound chromatically across the keyboard, allowing you to play it like a multi-timbral instrument: good for creating immediately playable hybrid FX/synth patches. This also allows you to find the sweet spot in terms of re-pitching your layered sound, making it perfectly geared towards more abstract sound effects for movie sound designers and more super-detailed electronic genres that rely on unusual but finely crafted drums and FX elements.
A key workflow technique when using S-Layer for sound design is the easy creation of many semi-randomized, subtle variations of a layered sound, whether it’s impacts, hits, gunshots, synth hits or other potentially repetitive sounds where some organic variation is necessary if you want to avoid the “80s machine gun drum machine” effect (and maybe you don’t, that could be a stylistic effect for certain genres like synthwave too). You can build your layered sound, then hit the randomize buttons as many time as you need to create unlimited amounts of round-robin-style hits that never sound exactly the same twice.
Available for: Mac, PC | VST, AU, AAX
[button link=”https://twistedtools.com/shop/reaktor/s-layer/” target=”_blank” preset=”blue” text_color=”#ffffff” color=”#238bcd”]BUY NOW[/button] via Twisted Tools.
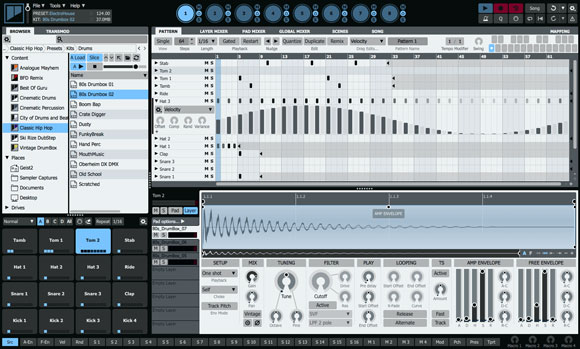
3) FXpansion Geist2
Basically the most awesome software MPC that never existed, Geist2’s combination of slightly well-hidden randomization settings, from loading a random selection of samples from a chosen folder to the pads of any engine, to randomizing the playback of all eight layers on each pad, to the TransMod system for fast and flexible modulation of almost any parameter, all make it something of a secret weapon for layering and sound design.Eight engines; 64 pads per engine; eight layers per pad. All in an environment that enables you to use, export or further process them in as many different ways as you can think of. I wrote more about Geist2 when discussing the best drum plugins, so have a look there for more details.
Available for: Mac, PC | VST, AU, AAX
[button link=”https://www.pluginboutique.com/products/2406″ target=”_blank” preset=”blue” text_color=”#ffffff” color=”#238bcd”]BUY NOW[/button] via Plugin Boutique.
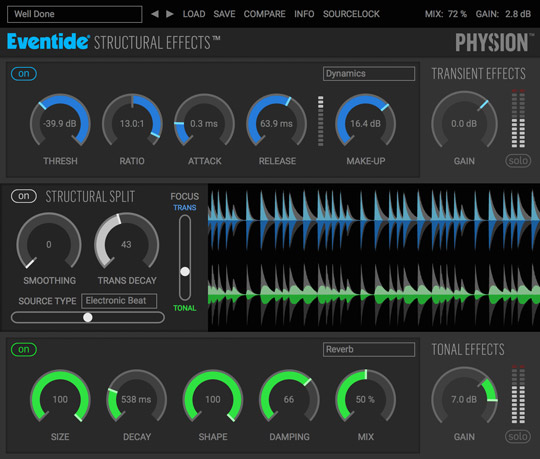
4) Eventide Physion
Moving on to look at different approaches to the idea of working with constituent parts and layers, we have Physion which deals with “structural split effects”. Much like what you can also now do with Steinberg’s Groove Agent 5, with Physion you can split the incoming sound into its constituent “Transient” and “Tonal” parts. This could be considered a kind of reverse to layering: deconstructing a sound back out into separate pieces.
Once you have isolated the parts, soloing just the tonal or transient part of a sound can completely change the character of a note, musical phrase or rhythm loop already. But resample these micro-parts and layer them with other drum, FX, synth or guitar elements, and you have a quick and original way of generating some unusual textures and characterful transients for your layered sounds.
Available for: Mac, PC | VST, AU, AAX
[button link=”https://www.pluginboutique.com/product/2-Effects/53-Multi-Effect-/3194-Physion” target=”_blank” preset=”blue” text_color=”#ffffff” color=”#238bcd”]BUY NOW[/button] via Plugin Boutique; also available as part of the Anthology XI bundle.
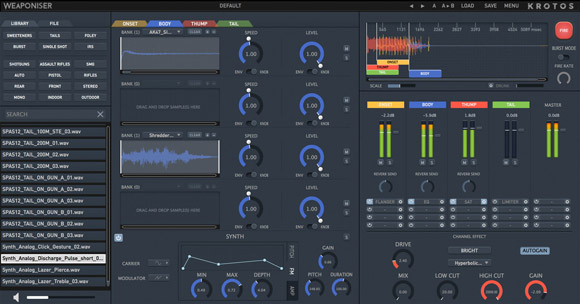
5) Krotos Weaponiser
Weaponiser from Krotos Audio is geared specifically towards creating powerful and flexible gunshot and lazer/sci-fi weapon sounds for video games and movies. You can layer up to four samples from the included library of professionally recorded weapons, each of which are contained in one of the four engines that correspond to the four basic stages of a typical weapon shot sound: Onset, Body, Thump and Tail. The first three of these engines also feature FM/AM synth modules mainly for enhancing the acoustic properties of the sample sounds, but they can also simply be used instead of any loaded audio samples, to come up with sci-fi weapon sounds – or of course, layered synth hits, leads and effects for any modern electronic music style. The Tail engine features a convolution reverb for helping place your composite sounds in an identifiable environment. And there are a host of other effects that can be added to any or all engines individually: EQ, Limiter, Saturation, Ring Modulation, Flanger, Transient Shaper and Noise Gate.
<iframe width=”560″ height=”315″ src=”https://www.youtube.com/embed/fmRGKahlY4E” frameborder=”0″ allow=”accelerometer; autoplay; encrypted-media; gyroscope; picture-in-picture” allowfullscreen></iframe>
Another cool aspect of Weaponiser is that you can slip the timings of each engine/sound layer relative to each other, making it very easy and creative to come up with unusual composite sounds very quickly. You can also trigger each stage separately or as a group via MIDI, useful in a musical context.
Available for: Mac, PC | VST, AU, AAX
[button link=”https://www.krotosaudio.com/products/weaponiser/” target=”_blank” preset=”blue” text_color=”#ffffff” color=”#238bcd”]BUY NOW[/button] via Krotos. Also, check out the 10-day free demo.
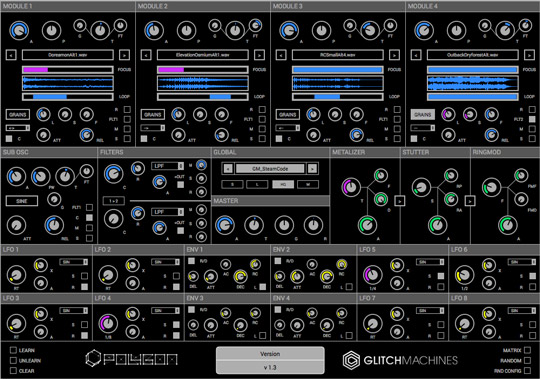
6) Glitchmachines Polygon
While Glitchmachines are well known for their range of sample libraries and plugins that each provide different angles on achieving glitchy and heavily processed electronic sound effects, here I want to focus on their composite sampler plugin instrument Polygon, which is a very suitable beast for layering experiments. While the GUI could look fairly intimidating at first inspection, at the core of Polygon are the four sampler modules where you can layer up any combination of audio samples you wish to form the basis of a new composite-sound synth patch.
Each sampler module functions as a self-contained unit with its own start/stop/loop points, envelope and even granular synth options for really stretching the sonic potential of your source material – before you even get to the filters and modulation options.
There is also a Sub Oscillator for adding some weighty bottom end and punch, and which can do a great job of anchoring what could sometimes be brittle and flighty glitched-up, providing body and substance for when your granular sample destruction reaches near-breaking-point.
All five sound sources feed into a dual-multimode filter section, and the parameters of the layers or composite group can be modulated using the powerful array of envelopes (four) and LFOs (eight!). While you can assign and keep track of modulation routings manually in the 36-slot modulation matrix page, I still usually prefer to start with hitting the Randomize button and seeing what Polygon can do with the source sample layer material I loaded, and from there tweak settings to taste. You can also set exactly which parameters will be randomized in its own Configuration page, so much like the workflow in Polyplex, you can start relatively random, find something that has potential, and then gradually chisel it down to something completely workable.
By the way, we couldn’t feature Polygon without also mentioning Palindrome, a kind-of next-gen version of Polygon in some ways, that doesn’t so much supersede as supplement Polygon by putting the granular processing aspects of the synth center stage. We’ll be featuring Palindrome in more depth in a later article though when we take a closer look at granular effects and instruments in general…
Available for: Mac, PC | VST, AU, AAX
[button link=”https://www.pluginboutique.com/products/1912″ target=”_blank” preset=”blue” text_color=”#ffffff” color=”#238bcd”]BUY NOW[/button] via Plugin Boutique.
Stay tuned for the next parts in this series for many more tips and inspiration.
- Part 1 – Delay
- Part 2 – Distortion
- Part 3 – Layering
- Part 4 – Classic Modulation FX
- Part 5 – Stereo & Panning FX
- Part 6 – Pitch Shifting
- Part 7 – Reverb
- Part 8 – Step Sequencers & Envelope Generators
- Part 9 – Creative Filtering
- Part 10 – Granular Synthesis & Sample Processing
For more information on drum plugins and drum sound design, also check out our articles on 25 Of The Best Drum Plugins In The World and 10 Essential Drum Production & Synthesis Techniques. Several of the plugins featured in this article are also part of some of the Best Music Production Plugin Bundles.
And as ever, leave a comment below with your favorite sound design techniques and effects, and the tools you use to create them!
For a definitive collection of tips and techniques for enhancing your music to a professional level – from advanced compression techniques to shaping and placing your sounds in the mix with correctly applied reverb and fine-tuned EQ adjustments – don’t forget to check out our Ultimate Guides ebook series:
If you liked this post, you’ll definitely find these useful too:
The 10 Best Creative Filter Plugins In The World
5 Of The Best Guitar Amp Sim Plugins And How To Get Great Tone With Them
10 Ways To Make Your Soft Synths Sound More Analogue