

[the_ad_placement id=”top-content-300×250″] It’s never been more important to be able to craft distinctive and original sounds if you want to make your songs and productions shine and really stand out.
Fortunately, there have also never been so many tools to choose from to enable you to do just that. With this in mind, we’re kicking off a new 10-part series of posts that explore essential sound design techniques, along with the very best and most cutting-edge plugins for the task in each corresponding category.
Whether you are designing huge cinematic impacts, weird and unique layered drums kits and synth sounds, processing foley and atmos sounds to evoke imaginary sci-fi environments, or simply looking to subtly (or maybe not-so-subtly) spice up the mix of your next electronic, hip hop, rock or pop song with some really distinctive ear candy elements, there are essentially only really a handful of core ways to push, pull, mangle and otherwise transform your audio.
This shouldn’t be felt as a constraint, though. In fact, once you get your head around these few key processing options, and even more importantly, how they can be stacked or chained together in different combinations, you can leverage them with a bit of practice to achieve literally any sound you might be able to imagine.
In this new series of posts on sound design, we’ll break down 10 broad techniques or processing steps that you can think about when approaching your sonic sculpting in any kind of sound design project, with plenty of tips and suggested plugins to try them out with along the way.
My hope is that by focusing on each potential process one at a time, you can build up a repertoire of techniques and tools to mix and match however you want, and create a methodology and some workflows that work best for you and your own style. We’ll be covering a single aspect of sound design in each post, such as modulation effects, layering, creative distortion, panning and stereo effects and so on, and include a rundown of some of the best plugins for those tasks for you to check out and add to your personal toolbox.
A note on the plugin selections: I tried to steer clear of plugins which are great but have been discussed a lot already, usually in the context of conventional mixing, in favour of those processors that are still very high quality but also offer something a little different: a certain unusual approach or GUI, or that extra flourish of weirdness or combined effects that give it a certain bite or character.
Note: The categories are admittedly fairly arbitrary in places, and many of the plugins featured could belong to two or more categories. But it’s a good way of dividing up a very large field, enough that you can browse easily and make sense of all the best options available, without it being too chaotic!
We’ll start with delay below, but let’s first go over a few useful tips that apply to any sound design situation.
And don’t forget to check out the other parts in the series:
- Part 1 – Delay
- Part 2 – Distortion
- Part 3 – Layering
- Part 4 – Classic Modulation FX
- Part 5 – Stereo & Panning FX
- Part 6 – Pitch Shifting
- Part 7 – Reverb
- Part 8 – Step Sequencers & Envelope Generators
- Part 9 – Creative Filtering
- Part 10 – Granular Synthesis & Sample Processing
Some Sound Design Tips & Principles
- As noted above, the magic happens when you artfully combine effects and sounds into custom chains and layers. Once you understand how powerful certain combinations of effects can be — or similarly, the layering together of separate sounds — not only do you have a massive advantage in your ability to choose the best tools to achieve what you want quickly, even with relatively “limited” individual plugin processors, but you’ll have a deeper appreciation for those celebrated and popular multi-effects that achieve their distinctive sounds through combining processors, and a much greater understanding of how they are doing what they do — which will allow you to get the most out of their potential, and the most bang for your buck. This in turn will help you in developing your signature sound. We’ll be covering the best multi-effects plugins at the end of this series, by which time you will hopefully have gained a greater understanding of just how powerful they can be when you forego the presets and dive into sculpting your own multi-effect combinations.
- Develop a light touch. With practice, you’ll know when a sound works better being processed to oblivion, and when to pull back and do something more subtle that is more like an enhancing nudge rather than a punch in the face. When practicing designing and processing your sounds, it can help to do a “gentle” version and an “extreme” version of each processing step, with different levels of intensity, and render those out separately. Later, when you come back with fresh ears, you might be surprised which one you like best.
- Automation is your best sound design friend. Remember that you have the best sound design tool already, your DAW. With automation you can either program or perform in real time, as many layers of changing parameters and modulating sources as you want. Combine this deceptively simple tool with a chain of effects, and you’re at a whole other level of sound design possibilities.
- Even if you’re mangling sounds beyond recognition, great starting material still helps. Yes, you can throw a bunch of junk sounds into a glitch effect plugin and maybe end up with something useful. Maybe. But starting off with well-recorded, well-produced sounds can yield much better and more consistently and reliably useful results than trying to process garbage into something shiny and new. In fact, fully mixed and tracks and stems from your previous finished songs and mixes are prime source material, since they are already nicely polished but also (hopefully) bear your signature trademarks of sound selection and processing, which can be brought out again in a fresh context.
- Get under the surface of your chosen tools. With the range of options available in all of our laptop studios, it’s never been easier to get a cool sound out of a new plugin. But what is still difficult, and still where the magic is, is spending long enough with your chosen tools that you get under their surfaces and start to manipulate them like the modern musical instruments they can be. This takes longer than flicking through preset libraries (although actually, that’s debatable…), but so worth it in terms of the satisfaction and quality results you get from creating an effect that is distinctly your own.
But how do you know which tools you should spend the time getting to know better? Which will make the tasks of sound design not just “possible” but fun, fast and inspiring at the same time? Well, that’s why we put this series of posts together, to help you narrow down your choices and spend more time creating.
Part 1: Delay Effects In Sound Design
Delay is one of the simplest and most common studio effects, generating distinct repeats of the source sound that can add an essential sense of depth and space to a sound or mix that is quite different from from the dense washes of reverb tails.
For sound design purposes, delay effects (like most effects types) get most interesting when you crank up and “misuse” most of the controls more than you would for mixing duties, to really bring out the character of the unit: Amount, Feedback, any Drive or Input/Output controls, and any Filter or EQ sections set to quite extreme cuts or boosts to make the repeats more ghostly or more punchy, as suits your taste. Inducing subtle — or not so subtle — distortion, clipping, saturation or compression, or howls of self-oscillating feedback, can all bring a wildness that jumps static source sounds into life.
As is typical with sound design session workflow, it’s a good idea to render your extreme delay lines to audio – maybe once you’ve also made some automation passes to change the Feedback and other controls over time – then you can go back and chop out the repeats or particular sections where something magic happened between the source material, the character of your chosen delay plugin, and the settings you had.
Working with rendered audio gives you a different sense of what the effect has contributed, and more importantly, allows you to draw a line under the previous processing step and resample or start a whole next stage of processing! Beyond basic delay functions, the “modulated delay” has been a mixing and sound design staple for decades.
Here, the delay repeats are not just sent through as relatively clean copies of the original sound, but pass through other processes as well: pitch-shifting is common, as are processors that generate minutely time-shifted copies that create the well-known effects of chorus, phasing and flanging.
When you have these delays that are so short they begin to blend with the original sound, you get into that whole other realm of cool effects (chorus, flanging, phasing etc.), which we’ll get into properly in a later post in this series.
For now we’ll stick to looking at tools that generally excel at providing longer and distinct, separate delay repeats — but with a twist:
The Best Delay Effects Plugins For Sound Design: Roundup List

1) Native Instruments Replika XT
Replika XT features five different delay modes, from Modern and the excellently abstract Diffusion to more recognisable Vintage Digital, Analogue and Tape. But it’s actually much more than just a delay, featuring further layers of effects that you can apply to your delay line, in the form of phasing, flanging, chorus, pitch-shifting and micro-pitching, frequency-shifting, and filtering. Overall, Replika XT excels at producing shimmering delay cloud-clusters of sound, similar to treated reverb effects but with a distinct definition and airiness. Great for atmospheric FX hits and moving atmos pads that can be based off other mixed elements in a track, lending a subliminal cohesion. You get fantastic crystalline sound quality, and yet the plugin is highly processor-efficient so you can run many instances in a sound design project without any trouble.
One of my favourite aspects of Replika XT is the visual pattern display in the middle of the GUI. Similar to Soundtoys Echoboy’s pattern display, it features rows of lines that represent each repeat, giving you very easy and intuitive control over the density, feedback length and decay (or swell) of the delay “particles”. Here you can set up complex rhythmic delay patterns, perfect for augmenting drum tracks or loops, hits, or chopping and layering with other sounds for fast but unique shifting textures. Highly flexible, and highly satisfying.
Available for: Mac, PC | VST, AU, AAX
[button link=”https://www.native-instruments.com/en/products/komplete/effects/replika-xt/” target=”_blank” preset=”blue” text_color=”#ffffff” color=”#238bcd”]BUY NOW[/button] via Native Instruments.
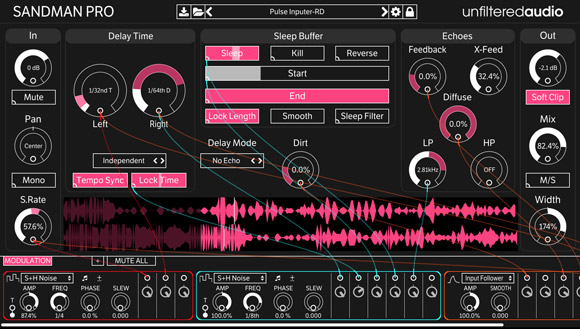
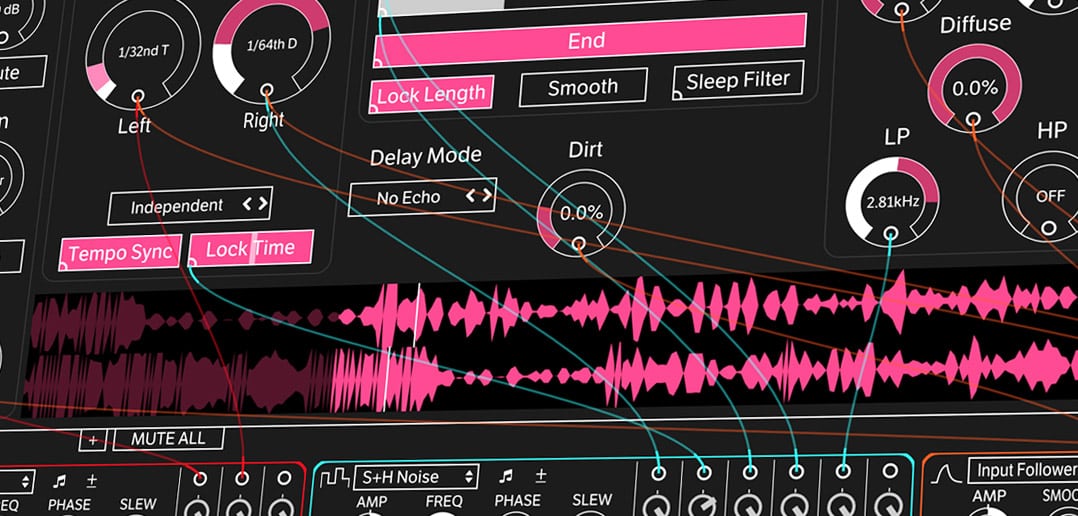
2) Unfiltered Audio Sandman Pro
Sandman Pro is one of the most full-featured and cutting-edge delay plugins available. Like Replika XT, it has a range of different delay modes that start with regular Tape Delay, but things get really interesting when you jump down to the Modern Instant or Glitch Shifter modes and start messing with the Sleep Buffer section settings and drop-down Modulation panel at the bottom.
The modular-style patch cabling that illustrates which functions are being modulated, and the well-curated selection of controls you have access to on the main GUI, make Sandman Pro ideal for coming up with hyper-modern, sharp-sounding effects (that still avoid the “cheap digital”-sounding pitfall of some lesser plugins), that can get very pleasingly biting, unpredictable and inspiring for resampling and further processing when pushed to more extreme settings.
Available for: Mac, PC | VST2, VST3, AU, AAX
[button link=”https://www.plugin-alliance.com/en/products/unfiltered_audio_sandman_pro.html” target=”_blank” preset=”blue” text_color=”#ffffff” color=”#238bcd”]BUY NOW[/button] via Plugin Alliance.
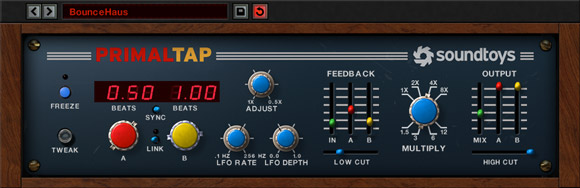
3) Soundtoys PrimalTap
While Soundtoys best-known delay plugin is probably the much-loved Echoboy, that one has already been discussed a lot (not least in my own Best Delay Plugins post, here). Echoboy is still one of the most capable and flexible delay plugins around, and is certainly a worthy tool for sound design duties, but here we want to highlight another plugin from the Soundtoys 5 bundle, PrimalTap.
PrimalTap is modeled after a cult piece of 80s studio hardware called Prime Time. This unit’s most distinctive feature when it was released was actually born out of a technological limitation at the time: the memory needed for the cutting-edge digital delay circuit was super-expensive, so the designers introduced a Multiply knob which allowed you to increase the limited delay time by incrementally reducing the sample rate. For every doubling of the delay time, the unit would also halve the sample rate of the resultant audio. Skip to the end: everybody loved the “limited” crunchy lo-fi character of the heavily down-sampled delay lines the Prime Time could create — and they especially loved the ability to manipulate this effect on the fly — and a legend was born. With the PrimalTap plugin, obviously you don’t need to worry about processing power limitations and forking out for a memory upgrade to provide a frankly indulgent 256ms of delay… 😉
But even with our relatively unlimited modern-day computing power, you can still benefit from the extremely characterful processing style the original unit inspired. Combine the Multiply knob feature with the Freeze toggle button, which captures a snippet of incoming audio as the isolated source material for further processing, and you can get into some seriously cool pitch-shifted, droney, sample-crunched sound design madness. Again, great for spinning atmospheric pads, one-shots and warped-backing-vocal sound design effects out of existing tracks and performances from your project.
Available for: Mac, PC | VST, AU, AAX
[button link=”https://www.pluginboutique.com/products/1857″ target=”_blank” preset=”blue” text_color=”#ffffff” color=”#238bcd”]BUY NOW[/button] via Plugin Boutique, as part of the Soundtoys 5 bundle, or as a single plugin.
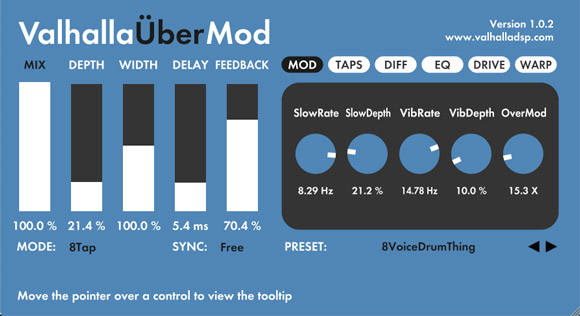
4) Valhalla DSP UberMod (And Valhalla Delay!)
UberMod, or ValhallaÜberMod to give it its proper umlauted title, is Valhalla’s take on a stereo multi-tap delay and modulation plugin that sits well alongside their producer-favourite reverbs VintageVerb, Plate, Room and Shimmer. All of the usual culprit delay-based effects can be easily achieved with the super-clear and intuitive GUI, plus a range of sounds far beyond the typical that are constantly surprising given the on-first-glance minimal control set. For me though, it’s messing with weirder combinations of the features like the Diffusion, Drive and Warp controls where UberMod particularly stands out for designing really unique effects.
Valhalla designer Sean Costello elaborated on the creative design process that lead to the development of UberMod, which sounded fun: “Why create a single plugin that covers all of these sounds, instead of several plugins where each plugin is tailored to a specific application? I’m not exactly sure. In many ways, I feel that ValhallaÜberMod was a plugin that designed itself, instead of me creating something that did exactly what I wanted it to do. At each stage during the development process, I uncovered new and exciting sounds that defied easy categorization. I decided to create a plugin that allowed for those sounds to be dialed in, as well as sounds that as yet remained undiscovered.”
Here’s also a great overview of what Ubermod can do that really helps you get to grips with it’s potential, from Sami Rabia aka Aiyn Zahev:
Also check out Valhalla’s free Freq Echo, a frequency-shifter and analogue-emulating echo delay that provides a good streamlined entry-point to the Valhalla ethos and level of quality.
Note: You must also check out Valhalla Delay, their new flagship delay plugin which was released just the week after I published this article! It’s fantastic and of course there is a good deal of overlap between Delay and Ubermod, although Delay is that much more fully-featured, great-sounding and even more capable of whacked out analogue-style delay effects. Recommended!
Available for: Mac, PC | VST, AU, AAX
[button link=”https://valhalladsp.com/shop/delay/valhalla-uber-mod/” target=”_blank” preset=”blue” text_color=”#ffffff” color=”#238bcd”]BUY NOW[/button] via ValhallaDSP.
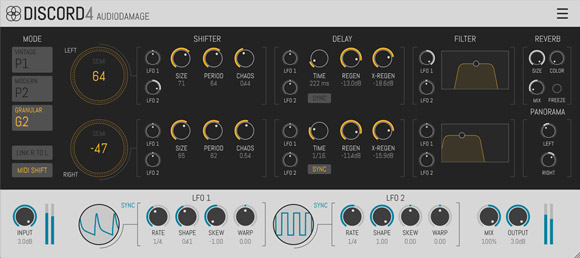
5) Audio Damage Discord 4
Discord 4 is Audio Damage’s stereo pitch-shifting delay plugin. It’s also the latest version of the company’s original and most popular effect, the one that helped make it’s name really. Discord started off as a model of Eventide’s H910 Harmonizer, a hardware unit whose DNA can be found in pretty much all of the plugins mentioned in this article, but over the years and several version iterations, it’s now very much it’s own beast and is kind of a must-have in every self-respecting electronic producer and sound designers toolbox (note: you can now also get Eventide’s official plugin version of the H910 in native and UAD formats, which comes in both single and dual-channel versions, so also check that out).
Discord 4 features three different core algorithms. Vintage mode is the original H910/H949-modeled algorithm. Clean mode has less old-school colour for a sleeker, more modern sound. Finally, Granular mode provides some of the most cutting-edge experimental effects, perfect for taking your sounds into completely different territory altogether.
Available for: Mac, PC | VST, AU, AAX
[button link=”https://www.pluginboutique.com/products/4645″ target=”_blank” preset=”blue” text_color=”#ffffff” color=”#238bcd”]BUY NOW[/button] via Plugin Boutique.
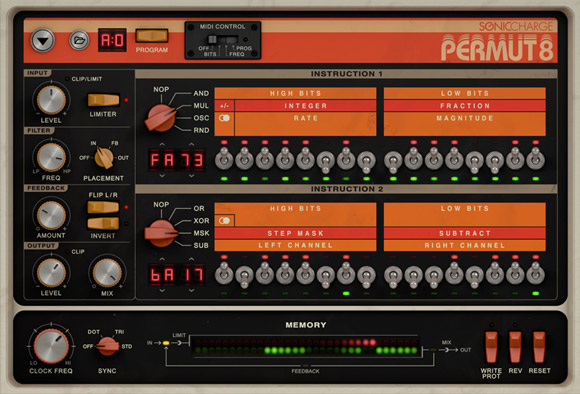
6) Sonic Charge Permut8
While it can look a bit intimidating on first glance, Permut8 is essentially based around a 12-bit delay line with variable sample rate, so similar in principle to the Prime Time / PrimalTap paradigm we discussed earlier. Where Permut8 is different though is partly in it’s use of rows of “operator” switches to control the delay lines and modulation routings. Much like with FM synthesis, this system of multiple stacked operators working together can come up with some very complex, distinctive and sometimes wildly unpredictable results. For our sound design purposes, this can of course often be just what is called for to spark surprise and inspiration.
Another unique and super-fun aspect of Permut8 is the ability to load what Sonic Charge call “alternative firmwares”. These alternate firmware banks, which you can load just like loading a regular preset bank, either add new features or completely replace the standard signal processing algorithms that the plugin uses. It’s a fun system, kind of a cross between a series of preset packs and official “hacked” versions that greatly enhance what was already a popular and great-sounding plugin.
Here’s developer Magnus Lindstrom demoing some of the alternative firmware packs, that gives you a really good idea of Permut8’s beautifully lo-fi and sometimes quite awe-inspiring style:
Available for: Mac, PC | VST, AU, AAX
[button link=”https://www.pluginboutique.com/products/382″ target=”_blank” preset=”blue” text_color=”#ffffff” color=”#238bcd”]BUY NOW[/button] via Plugin Boutique.
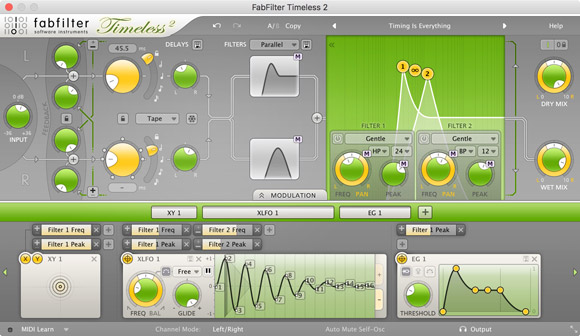
7) FabFilter Timeless 2
As you might expect from the makers of the industry-standard Pro-Q3 EQ, Pro-C compressor, and multi-band distortion/saturation plugin Saturn, Timeless 2 is great at delivering your straight-up delay lines when that’s what you need in a mix, but once you get into the incredibly flexible filtering, envelopes, LFOs and drag-and-drop modulation style you quickly start to realize just how deep and otherworldly this plugin can go. A modern classic.
Available for: Mac, PC | 32-64 bit | VST, AU, AAX
[button link=”https://www.pluginboutique.com/products/926″ target=”_blank” preset=”blue” text_color=”#ffffff” color=”#238bcd”]BUY NOW[/button] via Plugin Boutique.
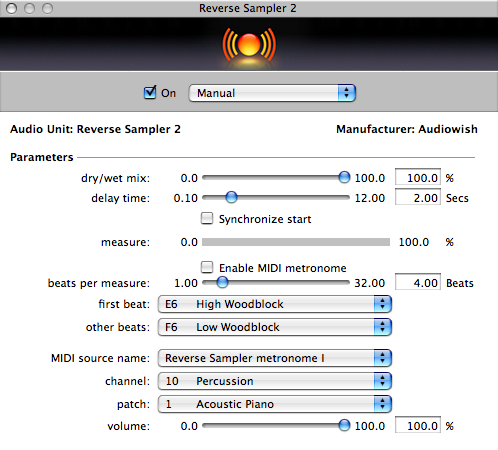
8) Audiowish Reverse Sampler 2
Reverse Sampler 2′ GUI is functional to say the least: but that is kind of the point I wanted to make here. Sometimes it can help to shake things up by not reaching for the most elaborate, beautifully glossy processor you have, but to start a sound design session by playing with a single, relatively simple plugin tool that does one thing really well, without fancy GUI distractions, and see just how much juice you get out of your original material and samples with variations on something like a simple (but actually quite advanced) real-time reverse-delay theme. Between the simple sound design staples of reversing, pitching up/down, and layering, you can accomplish an awful lot, and something like Reverse Sampler 2 will help with the first of these.
Available for: Mac | AU only
[button link=”http://www.audiowish.com/audio-units/reverse-sampler.html” target=”_blank” preset=”blue” text_color=”#ffffff” color=”#238bcd”]BUY NOW[/button] via Audiowish.
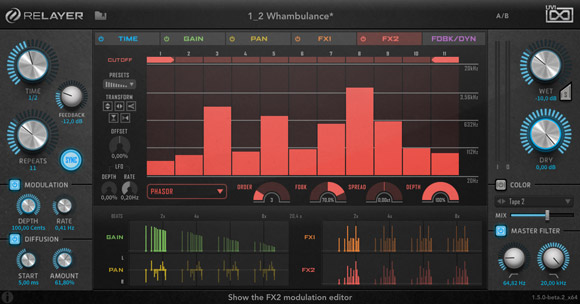
9) UVI Relayer
UVI call Relayer their “precision creative delay”, and precision is exactly the right word. You can do so much with this plugin, but importantly, it’s also genuinely easy and intuitive to operate.
The standout aspect of Relayer for me is the central delay Tap display, where you can work with the individual delay taps much like you may be used to working with automation lanes in a sequencer or arpeggiator. You can manipulate individual delay taps in space/placement and time/density, or shape the overall pattern as a whole extremely easily: it’s hard to think of many other plugins that have the ease-of-use/flexibility ratio that Relayer has. This ability to switch dynamically between working on the overall macro aspects of a sound and then finessing the tiny details, make it a perfect pick for intricate sound design work.
Available for: Mac, PC | 32-64 bit | VST, AU, AAX
[button link=”https://www.uvi.net/en/effects/relayer.html” target=”_blank” preset=”blue” text_color=”#ffffff” color=”#238bcd”]BUY NOW[/button] via UVI.
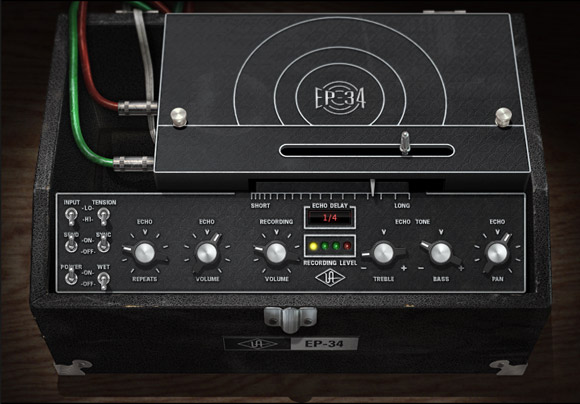
10) UAD EP-34 Tape Echo
I considered highlighting the UAD Korg SDD-3000 Digital Delay here, but seeing as we’ve already covered a number of “vintage digital” delay models and “Freeze” functionality that the SDD-3000 also has, let’s go with what is probably the best vintage tape delay emulation plugin bar none.
Yes, you could also mention the UAD Galaxy Tape Echo when talking tape delays, but the cool things about the EP-34 for sound design applications are the weird artifacts you get around the edge of sounds when you drag the Delay Time slider backwards and forwards while playing your sounds through it. On the real hardware, this slider is attached to an adjustable record head, so you’re literally lengthening the space between delay taps. In the plugin, assign this control to a knob or slider on your MIDI controller, and you’re golden.
The other special aspects of the EP-34 are the character of the overdrive and self-oscillation that occurs when you crank up the Volume and Echo Repeats knobs: a great way to quickly come up with infinite variations of distortion and filtering on your source sound, which you can then render to audio and pick out the best bits for resampling or further processing.
Available for: Mac, PC | UAD DSP-hardware plugin format
[button link=”https://www.uaudio.com/uad-plugins/delay-modulation/ep-34.html” target=”_blank” preset=”blue” text_color=”#ffffff” color=”#238bcd”]BUY NOW[/button] via Universal Audio.
As most of these plugins illustrate, the best and most distinctive sound design results occur when you combine delay with other effects: distortion, reverb, pitch and frequency modulation, to name a few. Stay tuned for the next parts in this series, all coming over the next couple of months, for many more tips and inspiration on that. Check out the other parts in the series:
- Part 1 – Delay
- Part 2 – Distortion
- Part 3 – Layering
- Part 4 – Classic Modulation FX
- Part 5 – Stereo & Panning FX
- Part 6 – Pitch Shifting
- Part 7 – Reverb
- Part 8 – Step Sequencers & Envelope Generators
- Part 9 – Creative Filtering
- Part 10 – Granular Synthesis & Sample Processing
For more delay plugins and inspiration, also check out our article on The Best Delay Plugins In The World. Several of the plugins featured in this article are also part of some of the Best Music Production Plugin Bundles. And as ever, leave a comment below with your favourite sound design techniques and effects, and the tools you use to create them!
For a definitive collection of tips and techniques for enhancing your music to a professional level – from advanced compression techniques to shaping and placing your sounds in the mix with correctly applied reverb and fine-tuned EQ adjustments – don’t forget to check out our Ultimate Guides ebook series:  If you liked this post, you’ll definitely find these useful too:
What’s The Best DAW Music Production Software, Really? An Essential Buyers Guide
25 Of The Best Drum Plugins In The World
10 Ways To Make Your Soft Synths Sound More Analogue