[the_ad_placement id=”top-content-300×250″]
Following our recent round up of 25 of the best drum plugins for a variety of genres and production styles, we asked producer Jonny Strinati to take us through some key techniques for programming certain drum sounds, highlighting some of the best regarded plugin tools for particular drum production tasks, and to provide some general drum workflow tips and tricks that everyone should be implementing in their productions.
Also feel free to add your own tips and tricks in the comments at the foot of the page!
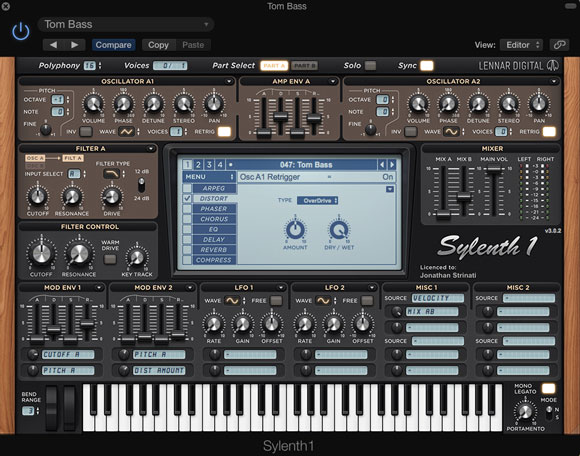
1. Designing Gritty Tom Perc Basslines For House And Techno With Sylenth1
You can synthesize really great percussion sounds with most soft synths these days. As long as your soft synth features some sine or triangle waves, some envelopes to modulate the pitch with and maybe some in-built distortion options you’re in good shape. In the following example we’ve made a 909 style Tom using Sylenth1. We’ve used a triangle waveform, pitched down one octave and used a modulation envelope to modulate the cutoff frequency and the pitch of the synth. Modulating the pitch of a tuned down sine or triangle wave using an envelope and setting a fast attack, small decay and no sustain is usually a good starting point for synthesizing percussion sounds.
We’ve also driven the sound at the filter stage, added some Overdrive distortion, used a second envelope to further shape the pitch envelope and also the distortion envelope. Take note also of the Amp envelope settings, percussion sounds have no sustain so it’s important to bring down the sustain of your envelopes. Processing wise it’s important to consider the low frequency relationship, sidechain to the kick drum and the sound is relatively transient heavy programme the notes in between the kick drum.
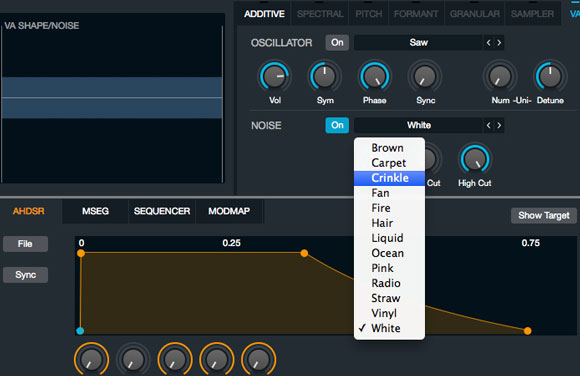
2. Add Bite To Drums With Noise Layers: Claps & Hi-Hats With Alchemy & Massive Noise Sources
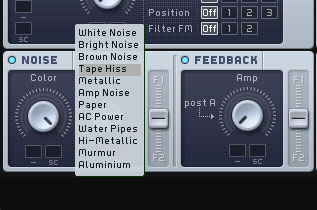
Whilst most synths features a noise generator, some synthesisers, such as Alchemy, NI Massive, Serum (and more) offer a variety of different Noise sources. Noise is great for synthesizing hi-hat and clap sounds, or even to add some top end presence to a synthesised snare or kick drum. So make sure you explore this feature of your synth when it comes to synthesizing top end drum sounds, and if your synth offers more than the standard white noise generator, experiment with the different types for some more unique sounding hits.
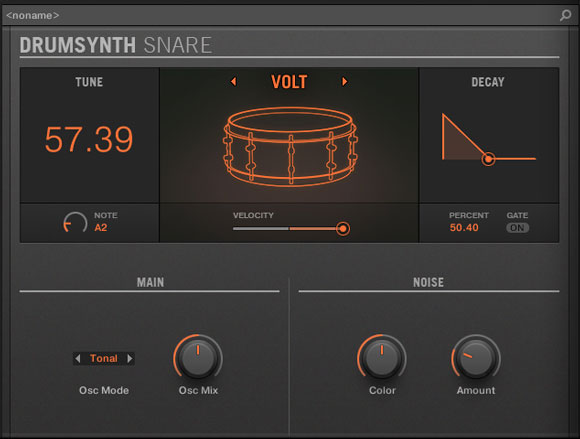
3. Always Tune Your Drums: In Key Drums With Maschine Drum Synths
Maschine’s Drumsynths are great for writing all sorts of different genres, capable of such a vast variety of different drum sounds from the classic synthesised drum machines right through to very live and organic sounding hits. What is really handy about most of the engines is the ability to tune each hit to a specific note, streamlining the process of tuning your kick drum to the key of your project (hugely important for a strong low end relationship between your kick drum and bass/sub). This doesn’t mean you need to tune each hit to the same note however, so you could set your kick drum to A1 for example and have your snare an octave up at A2, therefore occupying different frequency ranges but still in key. You could then tune your percussion sounds to some of the notes of your project scale, so not necessarily all A notes (or whatever your root note is) but notes within your project scale, be it A Minor, C Major, etc.
It’s also worth mentioning the awesome Shaker engine on the Percussion Drumsynth, set the mode to Perfomer and you have some great sounding shaker loops. Experiment with the Tune, Filter, Grain settings and more for different tones, grooves and textures. Here we made a really simple beat using the Sub engine Kick, Volt Snare and a Percussion Shaker loop:

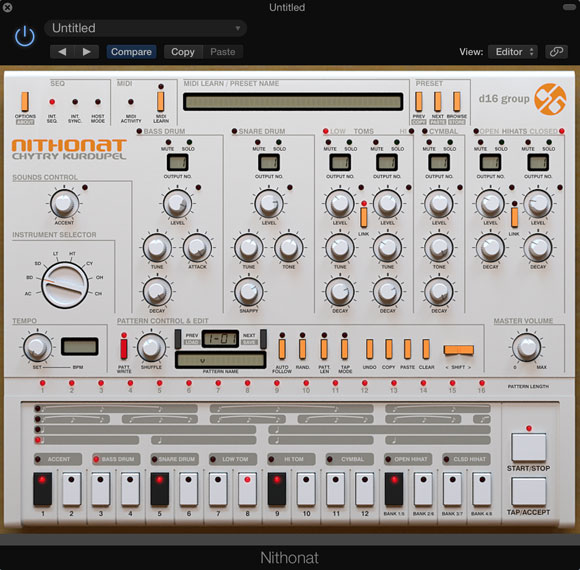
4. Beefing Up Vintage Drum Machine Patterns With Saturation: Punchy 606 Rhythms With Nithonat & Saturn
Whilst D16’s flagship drum machines are Nepheton and Drumazon, which are outstanding 808 and 909 emulations respectively, the lesser known Nithonat is also a dab hand at iconic drum machine recreation. Modelled on the classic Roland TR-606 machine, Nithonat excels at creating funky electro rhythms, housey tribal funk or electronic hip hop beats. It’s limited to a Bass Drum, Snare Drum, Toms (Low & High), Cymbal and Hihats (Open & Closed) and some basic Tune & Decay controls for each sound. But it’s simplicity is it’s beauty, and you’ll be programming your own funky rhythms with it in no time (make sure you turn off ‘Int. Sync. if using within your DAW). Listen to this following example where we’ve programmed a fairly simple 4×4 bass drum, snare, hi hats and tom pattern, turning the Shuffle amount up to 40% adds a really nice swing to proceedings:
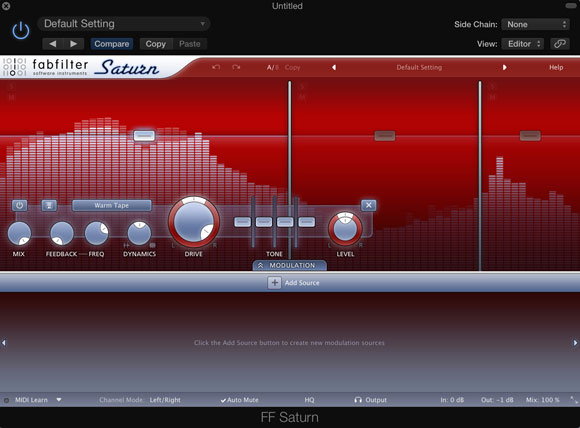
If anything it lacks a little attitude, so in this next example we’ve processed our loop through FabFilter’s Saturn for some multi band distortion. We’ve split the loo into 3 frequency bands, applying a generous amount of drive to the low end and low mids (up to 683Hz), we dial down the effect for the next band for a more open and spacious sound (638Hz to 6K) taking down the mix control to 18% and for the tops we change the distortion type to ‘Gentle Saturation’ and increase the Dynamics for some driven high end. Splitting the bands in this way creates a nice ‘ballsy’ effect but also means we are distorting both the low and high tom quite heavily, which adds some really nice aggression.
5. Programming Hi-Hats With An Arpeggiator
if you’re ever lacking some inspiration when it comes to programming drum sounds, try loading up an arpeggiator on your drum samples (provided it’s being triggered by MIDI in a synth or a sampler). This can be a really fun and creative ways to get some great rhythms down, that you wouldn’t necessarily think to program with your controller or from within your DAW.
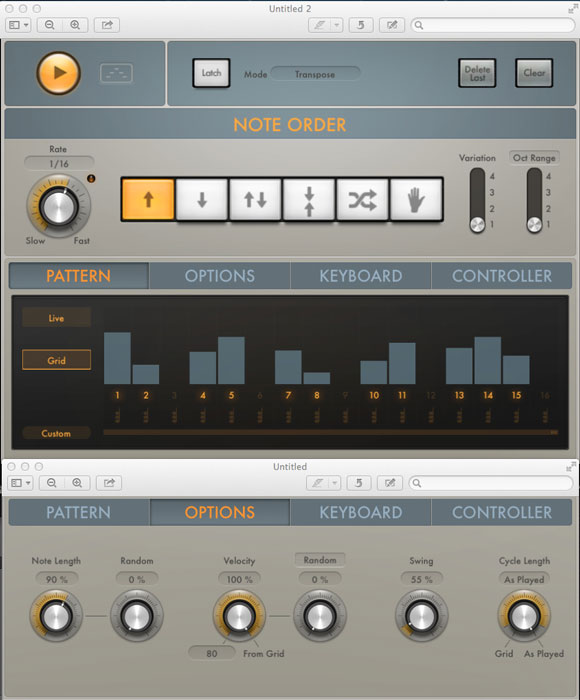
In this example we’ve loaded a hi hat sample into Logics EXS24 sampler, dragged out one long note for the length of a bar and then loaded up the Arpeggiator MIDI effect. Switching the Pattern mode to the Grid setting means we can edit velocity and drop hits out here and there, we’ve also applied some Swing in the Options page for a looser feel:
This example is really only scratching the surface with this technique, be sure to experiment further using the Rate setting for different rhythms, or automate the Note Length control for fills. You could even load some percussion hits and trigger a chord in your arp for melodic percussive rhythms.
6. Swapping Out Logic’s Drummer For Another Drum Machine
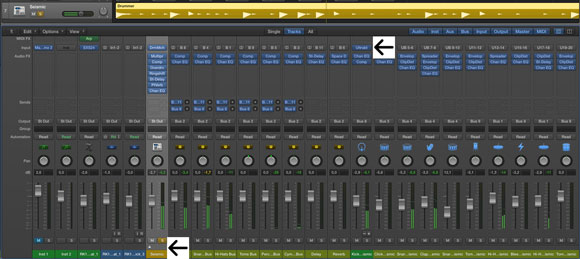
Whilst we’re on the subject of sparking groove based inspiration, Logic’s Drummer can be used to great effect when you’re not sure where to start with your drum pattern. Drummer is a very intuitive plug in, great for dialling in drum grooves with some very hands on controls and no need for meticulous programming. The main problem being the drum sounds on offer aren’t great, even when using one of the more electronic based drummers. The DrumMachine plug in is effectively a macro control for Ultrabeat, so when you open your mixer you’ll see the fold out arrow at the bottom of your DrumMachine channel, click this and it will reveal all your sounds contained within your drum group. One of these will be the Ultrabeat plug in, which is where all the sounds are being triggered from. Simply swap this out for another drum machine of your choice, and switch back to the Drummer plug in to intuitively control your drum elements.
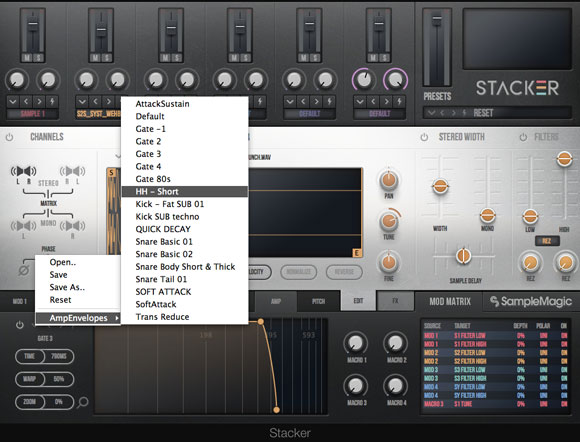
7. Layer Your Way To The Perfect Drum Sound: Making Drums With Sample Magic Stacker
Sample Magic’s Stacker plug in is a great tool for drum layering. What is particularly useful is the ability to mix and match synthesized drum sounds with samples. This is a very effective way for in key kick drums, making a synthesized and tuned low end, back of the attack and add something for the top layer with some more grit and character. Be sure to hi pass the top layer so there’s no low end clash, or alternatively and for a potentially more natural sound, tweak the envelope of your top layer to take out the low end, use no sustain and dial down the decay to taste. The envelopes in Stacker are really flexible, meaning you can really tweak the length of your samples to your liking. There’s even a set off envelope presets for a nice starting point or to quickly have some settings dialled in.
Stacker’s effects sound great too, the Clip Filter works wonders on bass drums and you can make some incredibly useful stacked claps/snares using the Scatter effect.
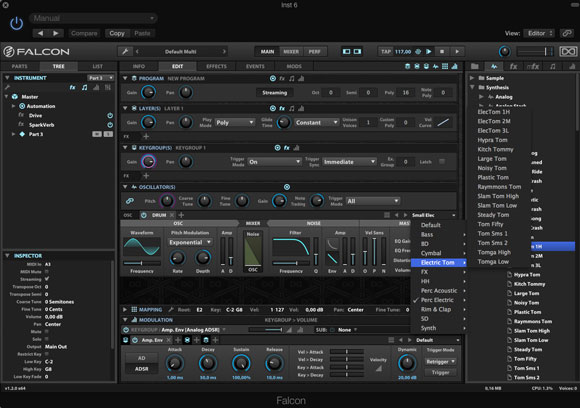
8. Cutting-Edge Synth Drum Kit Production With UVI Falcon
UVI’s Falcon is capable of pretty much most types of synthesis and sampling, there’s quite a learning curve with the instrument but once conquered you may find you seldom need to look elsewhere for sound sources. Other than sequencing Falcon can pretty much do it all when it comes to music creation and production, there is an array of presets you can browse from including a particularly useful section of synthesized drum sounds. Everything you can think of is included here, a whole section dedicated to Electric Toms, various Claves, Triangles, Rim Shots, the list goes on … Falcon also features a very in-depth FX section, including some stunning Reverbs. Delays, an 8 band parametric EQ, Compressors, Distortion units and much more. Whats more you can mix from within the instrument, processing each sound independently or as a group, you can even set up aux sends in the Mixer section. Meaning you can synthesize, process, mix (and master if you wanted, there’s a maximizer and limiter) a full drum kit all from within one instance of Falcon. Here’s an 808 style distorted bass drum we quickly knocked up:
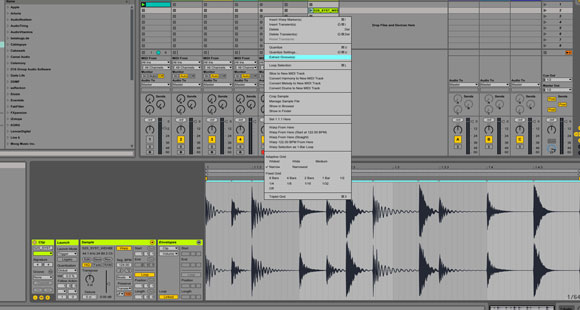
9. Working With Groove & Swing: Extract Groove In Ableton Live
Although not an instrument or processing tip, it’s worth noting here that getting some groove into your drum rhythms is imperative for the right feel or flavour. The slower your BPM setting the looser the feel you’ll be able to get away with. If you like to play your drums in live with a controller, don’t be so quick to quantize or even do some partial quantizing (Maschine features a quantize 50% option, to move your notes halfway from the out time place you played them in to the nearest 16th note). If you do a Google search, people have actually made custom grooves that you can download and apply to your drums, whatever your DAW. The Freemasons even went through the painstaking process of creating grooves of all the Maschine & MPC swing settings and uploaded a Youtube tutorial on how to apply these within Logic and Ableton, the MPC swing settings are particularly useful if you’re after that iconic 90’s US house feel.
Furthermore, most DAW’s feature some kind of ‘Extract Groove’ tool, so if you hear a track that features the kind of swing you’re after, chop out a 2 bar loop and load it into your DAW and extract the groove.
[the_ad_placement id=”bottom-content-300×250″]
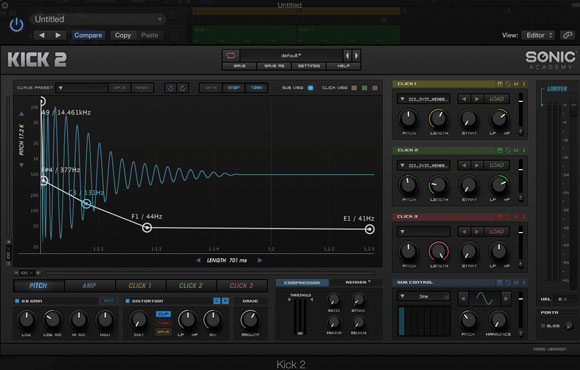
10. Kick Drum Sound Design & Recreating Your Favourite Kicks With Sonic Academy Kick 2
With so much importance placed on the kick drum in electronic music, recently we’ve seen a rise in plug in’s dedicated to this sole task – PluginBoutique Big Kick, D16 Punchbox, Sonic Academy Kick (recently updated to Kick 2). These plug in’s gives us a huge amount of control over various aspects of the kick drum, for example with Kick 2 we can not only control the pitch of our drum but also the pitch over time, so we can really tweak what note our drum drops to. As mentioned previously in this feature, having kick drums that are tuned to the key of our project is important for a solid low end. A great feature of Kick 2 is the ability to stack up to 3 clicks along with our tuned sub, we conveniently have hi pass/low pass, pitch and envelope controls for all the clicks and the sub meaning we can design our own very unique in key kick drums. A nice way to approach this technique is to have a tuned sub matching the key of our project, a punchy click providing mid range presence and then a hi hat for the top end presence so the drum cut through the mix:
Another great way to make kicks with Kick 2, if you hear a kick in a track that you love the character of try sampling the click, load it into Kick 2 and just use the transient from that drum, then layer with your tuned sub. This method enables you to take elements from a drum sound that you love but you have much more control than you would sampling straight off a record, also you can tune your low end without altering the character of your click too much.
 Jonny Strinati works as a sound designer for Sample Magic, Attack Magazine and ADSR Sounds and produces under the name Strinner, releasing music on Tulipa Recordings, Selected Records & Natura Viva. soundcloud.com/
For loads more tips and techniques for enhancing your drum tracks to a professional level – from advanced compression techniques to shaping and placing your beats in the mix with correctly applied reverb and fine-tuned EQ adjustments – don’t forget to check out the Ultimate Guides series:
And if you like this post, you might also like these:
25 Of The Best Drum Plugins In The World 2016
10 Ways To Make Your Soft Synths Sound More Analogue
10 Of The Best Bass Synth Plugins In The World
What are your favourite drum programming tricks and techniques? Let us know in the comments below!





2 Comments
Lots of great advice here!
One question though:
“Another great way to make kicks with Kick 2, if you hear a kick in a track that you love the character of try sampling the click.”
Isn’t this a violation of the copyright of the original track, even though the sample taken is tiny?
(But since kicks are admittedly so integral to the sound of dance tracks, as you say here yourself, the particular kick’s value is not so tiny)
Pingback: How Can I Make Drums More Professional In Music Production?