It wasn’t that long ago (less than two years, if my calculations are correct) that we were discussing the previous versions of Ozone and Neutron, but here we are again with new improved versions of both over the last few weeks.
Both products are designed to take much of the (sometimes) dry and technical heavy lifting or “rocket science” of music production and mastering off the shoulders of artists and producers, and essentially enable us to focus on the more creative aspects of our music, confident that our productions are balanced and enhanced enough to translate well on the broadest range of listening devices and environments. Or, at the very least, make those necessary technical aspects of production more engaging and intuitive, leading to better, more consistent and reliably translatable sonic results in a shorter time and with less effort.
Over the last few years I’ve become a fan of Ozone and then Neutron. Here I’ve highlighted a few key aspects of both Neutron and Ozone that I feel can really help novices and more experienced creators alike achieve better results, faster. If you haven’t looked at these two products yet, or have been put off by the oft-repeated (but, in our view, completely inaccurate) idea of the machine learning aspects of Neutron “making my music for me”, I encourage you to look closer and give them a spin. Let’s go!
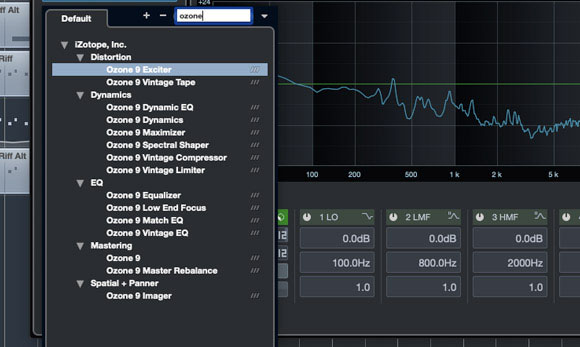
This is how the VST3 versions of the various Ozone 9 component plugins appear for selection in Cubase 10
1. Dude, Suite! Separate Component Plugins
Both products come in a three tiers of varying price and features: Elements, Standard and Advanced. The Standard and Elements editions have relatively stripped-down feature sets (and lower prices accordingly), which are potentially a good entry point to the Neutron and Ozone systems. But, I would always recommend the Advanced editions, not only because they offer the most bang for your buck by far, but specifically because with the Advanced versions, you can use all the Ozone and Neutron modules as separate component plugins.
This means that with these two suites of tools alone, you might just have all the third-party mixing and mastering plugins and plugin-chaining options you’ll need for most tasks and projects. The iZotope modules/plugins all feature vintage modeling options where appropriate (e.g. compressors and EQs), and certainly hold their own against other plugin options. Plus, of course, with the Neutron system the plugins can talk to each other across different tracks, or be swapped out for a full instance of Neutron or Ozone whenever you want (and vice versa, when you don’t want to load a lot of full Neutron or Ozone instances on multiple tracks). Keeps your plugin list streamlined and functional, but with all the vintage-to-modern tonal options you might want.
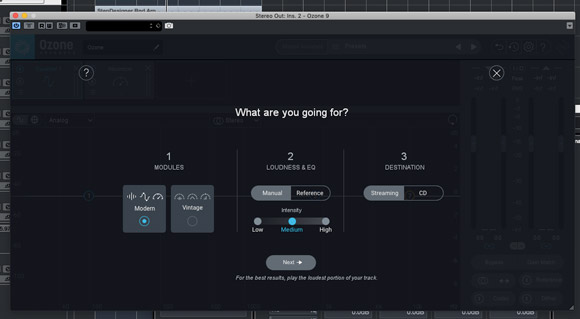
Ozone 9’s Master Assistant starts by asking you what you’re broadly going for, so it can suggest and implement the appropriate amounts and types of processing…
2. Learn Mixing and Mastering Like A Machine: Neutron 3’s New Mix Assistant, and Ozone 9’s Master Assistant
Neutrons machine learning algorithms enable it to provide you with highly usable starting point baselines for your mixes. Initially running the Mix Assistant usually results in any broad technical weaknesses in your mix session being highlighted and resolved — getting your general balance of sounds and instruments spread evenly across the entire frequency spectrum, for example — with the intention being that you’re then freed up to spend more time focusing on purely creative decisions.
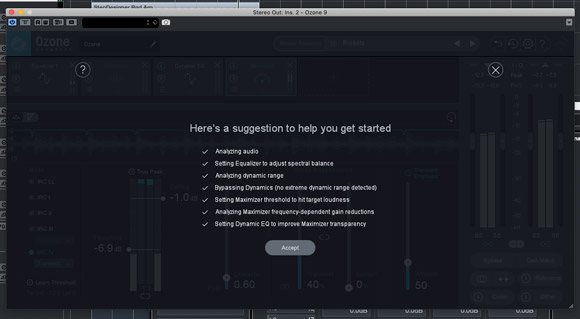
… after the processing has been configured and you can hear it in context, you have the option to Accept and apply the settings. Either way, you have complete flexibility to adjust any parameter or module afterwards.
For example, perhaps a combination of your monitoring setup, room acoustics and the length of time you’ve been mixing a single track have all conspired to encourage you to produce a quite dull-sounding mix balance that lacks crispness and definition in the high end? Once you’ve run Mix Assistant and established a corrected, more neutral balance, you are free to continue adapting its settings to generate exactly the vibe you want in your frequency balance, while feeling confident that your mix will now translate better on a broad range of playback devices and listening environments. A simple example, but it illustrates the point that these tools are both surprisingly precise when called on to be, and flexible enough to work with any kind of material or use case you throw at it.
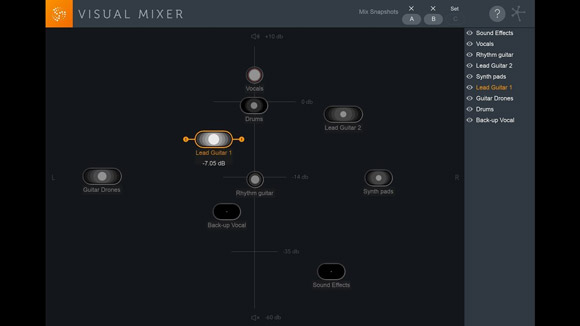
3. Mix Graphically Using The Intuitive Visual Mixer
Neutrons Visual Mixer allows you to position each of your musical elements graphically on an X/Y grid, with the Y vertical axis corresponding to the signal level of the selected channel, and the X horizontal axis indicating the left/right pan position in the stereo field. As long as each channel in your mix has a Neutron component plugin such as the lightweight Relay (previously called “Mix Tap”) plugin inserted, which communicates in both directions with the main “mothership” Neutron plugin, it will show up on Neutrons Visual Mixer, and any level/pan changes in either interface will be reflected on the selected channel.
If you struggle to hold a clear image of your mix in your mind with only rows of faders for reference, or maybe you just want to change up your workflow with a fun and novel (and very fast!) approach to balance and stereo arrangement, Neutrons Visual Mixer could really help. After all, as with many of the features in Neutron and Ozone, you can easily imagine this one day in the near future becoming an interesting new standard approach, adopted by other developers as well, for how producers get to grips and interface with their mixed sounds.
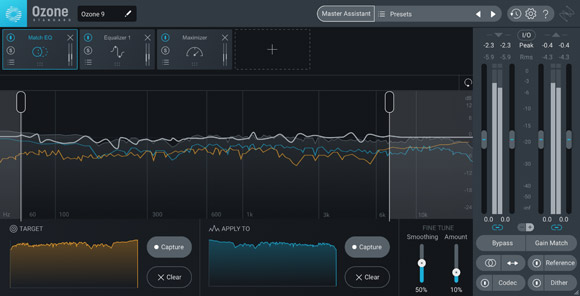
The Match EQ in Ozone 9 is great for quickly “borrowing” the EQ curves of your reference material.
4. Get In Your Reference Tracks Ballpark Quickly with Ozone’s Match EQ Snapshots, Tonal Balance Control and Master Rebalance
We have often harped on about the importance of reference tracks when producing here on GTPS, and Ozone can be a huge asset in this regard. It has several features which make it easy to load, analyze and utilize the qualities in your favorite reference tracks that you most want to emulate.
First of all, there is Ozone’s Match EQ. Match EQ was previously just a part of the main Ozone EQ module, but in version 9 it has been spun out to its own designated separate module. This infers just how much of a secret weapon Match EQ can be: play back or simply select one of your reference tracks from the Track Referencing menu and let Match EQ take a snapshot of the frequency curve, that you can then apply to your own material. You can save these Match EQ snapshots as presets, so after a while you’ll soon build up a custom library of EQ curves that you know are going to help deliver the specific frequency “color” that works for your chosen style, atmosphere or signature production sound.
Secondly, the Tonal Balance Control is available in both Neutron and Ozone. Tonal Balance Control similarly provides you with a library of “target” spectral profiles which you can line up against your own mix and see which broad frequency ranges are within an acceptable range for your chosen style or genre, and which need some boosting or attenuation to achieve an overall balanced final track. What is cool is that if you have Neutron loaded i your project and active on your individual channels, you can use the Tonal Balance Control window in either Neutron or Ozone to make EQ and gain adjustments that will be applied to the appropriate individual channels settings. It seems like magic, and it is a bit.
Although the primary features of Neutron and Ozone generally mirror the distinction between “mixing” and “mastering”, with each new version both tools continue to increasingly blur the long-regarded hard boundaries between these phases of the overall production process, allowing for a more fluid overall workflow and making it easier to correct or alter earlier mix decisions without having to start the whole thing again from scratch. An example of this is Ozone’s Master Rebalance feature, introduced in Ozone 9. Master Rebalance uses a version of iZotope’s Source Separation algorithm to analyze any previously mixed stereo file and provides effective control over the levels of individual instruments within the mixed audio: something that has long been considered effectively impossible due to the complexities involved in intelligently identifying where one sound “ends” and the other “begins” with a single recorded sound file. So now, even at the mastering stage, you have the option to virtually remix your tracks, adjusting the balance and overall tonality with something resembling the precision you would normally only get when working with the original multitrack mix project.
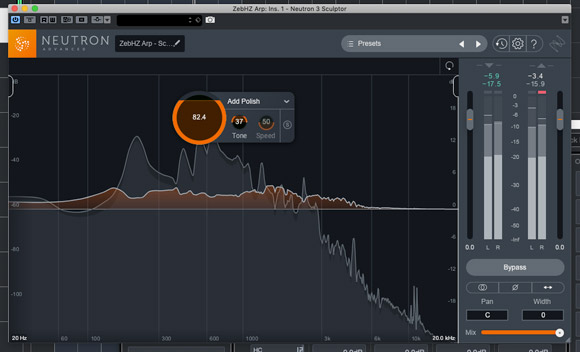
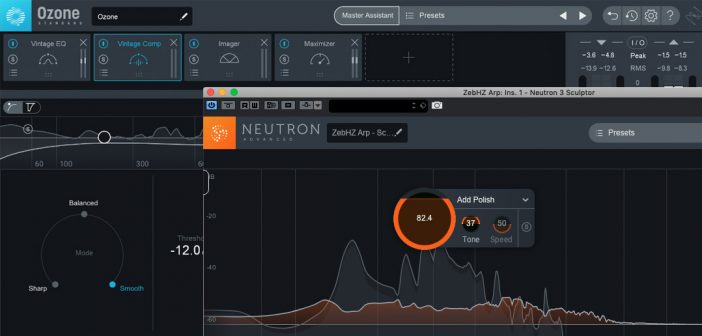
Neutron 3’s Sculptor module applying some gentle polish to a synth arp part.
5. Sculpt Your Individual Sounds To Perfection: Neutron’s New Sculptor module
The Sculptor module is available in Neutron Standard and Advanced, and is geared towards sweetening individual elements in the mix via a unique shaping system of what are effectively a whole bunch of per-band EQs and compressors. Sculptor communicates with the Track Assistant in order to intelligently understand where each element can or could fit into the overall sonic picture. Use it to fix elements that stick out of a mix with undesirable technical deficiencies, or alternatively use it to simple try out a myriad of purely creative options. For anyone fairly new to EQing and compression, Sculptor quickly shows you some of what it is possible to achieve in a typical mix context.
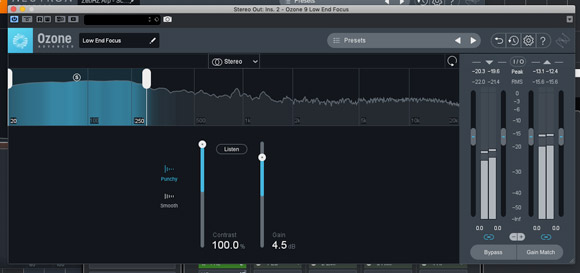
Ozone 9’s Low End Focus module, here set to Punchy and enhancing the frequency band below 250 Hz.
6. Get Consistently Tight And Focused Low-End: The Improved Masking Meter and the New Low End Focus module
Getting a tight and well-defined bass section in yours tracks has never been more critical, and Neutron and Ozone each provide tools to help achieve this. Used together, you’ll have no more excuse for flabby or muddy low end, even if your monitoring setup is less-than-ideal.
The Masking Meter became one of my favorite and most-used aspects of Neutron 2, and in version 3 it’s even better at identifying and visually highlighting where you have unwanted frequency overlaps between two elements: particularly useful for tweaking the relationship between kick and bass, which is always tricky to get just right by ear alone, down there in the sonic depths. With the Masking Meter engaged and Neutron modules inserted on each of the two channels, you not only get a visual representation of where the masking is occurring, but the ability to quickly and simultaneously apply a cut or boost on each sound, carving space for each sound in an elegant way.
Ozone also provides some dedicated help in this area now, with the new Low End Focus module. As mentioned, it can be difficult to hear and figure out exactly what is going on in the lower frequency ranges. Low End Focus listens (below the frequency decided by the band selector) and then adjusts the spectral image of each low-frequency sound, using either Punchy mode (for things like kick drums) or Smooth mode (for bass notes and longer tones). You can then use the simple Contrast and Gain controls to effectively “sharpen” and better define the whole low end of your mix.
We haven’t even mentioned a bunch of other new and existing features in Ozone 9 and Neutron 3 that could be really significant to you and your particular way of working. Ozone 9 now has Native Instruments NKS support, so you can use it within your Maschine or Komplete Kontrol-centered production workflow if those are your hardware tools of choice.
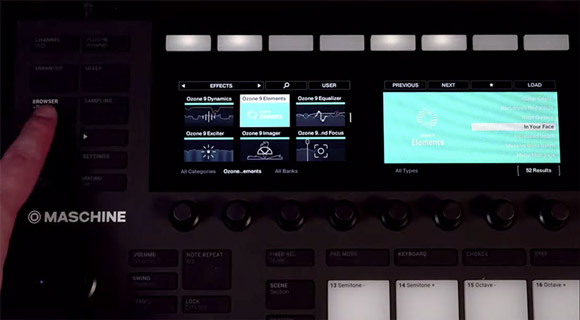
Ozone 9 now has NKS support, so you can control it through NI Maschine and Kontrol interfaces.
Both tools also continue to become lighter, faster and less taxing or your computers system resources with each version, even as they become much more powerful: the joys of living in the accelerated digital world. In some cases the performance improvements are quite dramatic, as the developers streamline what is going on under the hood. For example, Neutron 3 is much lighter on the CPU, allowing you to maximize its usefulness with multiple instances, individual component modules and Relays all running and communicating within a single mix project.
Overall, it’s not that iZotope’s products have “come of age” per se: they’ve been around and well-regarded for a while now in earlier iterations, and iZotope are well-established as market leaders with large numbers of users and fans both hobbyist and professional alike. But with the rate of development that we’ve seen recently with Ozone and particularly Neutron, I feel like a whole range of different factors are coalescing to make these tools more and more appealing. The ever-increasing performance levels of the software technology and algorithms iZotope are pioneering, paired with the power of modern personal computing, and the willingness of a new generation of producers who are not tied at all to the old analogue-studio based workflows and approaches that still inform much of how our favorite music production software is designed and used, mean that the tools and the marketplace they fit into are finally able to match or are in alignment with iZotope’s obvious ambition to revolutionize some of the fundamental ways that we all produce and process audio and music projects. Exciting times!
What are your favorite or most-used aspects of Ozone or Neutron? Let me know below!

