


[the_ad_placement id=”top-content-300×250″] Continuing our Sound Design series, in Part 2 we are looking at the many facets of distortion for sound design purposes: from subtle warming up and saturation to guitar amp effects, parallel treatments and full crunchy bit-crushed obliteration. Dive straight in below.
Catch up on the other parts in the series:
- Part 1 – Delay
- Part 2 – Distortion
- Part 3 – Layering
- Part 4 – Classic Modulation FX
- Part 5 – Stereo & Panning FX
- Part 6 – Pitch Shifting
- Part 7 – Reverb
- Part 8 – Step Sequencers & Envelope Generators
- Part 9 – Creative Filtering
- Part 10 – Granular Synthesis & Sample Processing
Part 2: Distortion Effects In Sound Design
Distortion effects are a core studio process that can be applied to almost any signal, from vocals and lead synths to atmospheric pads and especially drums, in multiple different ways, depending on whether you want their presence to be noticeable or not. In sound design situations, distortion can be used to either enhance a source sound or completely change it beyond recognition. Distortion typically does two things to a signal: it effectively compresses the waveform, looping off the peaks for that square-waved bite. But it also enhances and adds to the harmonic content present in the original sound, making it appear (and actually be) more “upfront” and aggressive in terms of its frequency balance. All of this adds up to distortion = some combination of more detail, and more bite. When you want to adjust the frequency balance and add life and presence to a sound, your first thought might be to insert an EQ and directly boost the high frequency range. But try experimenting with adding a distortion plugin instead, and setting the key controls (Drive, Tone, Input and Output Gain) to generate additional harmonics in the upper frequencies, that might provide that extra presence you really wanted in a more characterful and exciting way. This is essentially what an exciter processor like Waves Aphex Vintage Aural Exciter does, but you can achieve something similar with many different distortion types. It can be helpful to think of “sound designed” sounds as being built up of several different layers of discreet sounds and processing stages. And as with most aspects of sound design, distortion is often most effective when applied very selectively to specific portions of a final sound. So, try applying distortion to only one of three “Sub”, “Body” and “Top” layers of a kick drum, perc or snare sound. If you don’t have separate sound layers to work with, try using a multi-band distortion unit such as FabFilter Saturn to achieve the same thing: set a band, distort it, and sweep it across the frequency spectrum until you find where it really brings out the most interesting bite or character. As well as distorting specific “vertical” layers i.e. at certain frequencies, you can also experiment with distorting different “horizontal” parts of a sound i.e. at certain points over the duration of the whole sound in time. The most obvious technique here is to isolate or even add a whole new transient attack portion to a sound and then distorting it for extra definition and bite to mark the start of each note or hit. But you could also try fading in or out, or both, a distorted copy of the sound at some point during its complete envelope duration: in effect, modulating the distortion effect for additional movement within the sound. This can also be achieved effectively by combining distortion in a chain with an auto- or step-filter, perhaps an LFO or envelope generator plugin such as the CableGuys stuff, or any other modulation effect. So much of sound design is about imbuing your sounds with life and movement, at every level, and this is a surefire way to incorporate that. What is commonly referred to as “bit-crushing” usually involved a combination of both bit reduction and sample rate reduction. The aliasing artifacts you get from bit-crushing effects can add huge character and originality to a drum kit or bass or synth sound, or at more extreme settings be the source and inspiration for entirely new sound design elements, so don’t be afraid of dialing those two controls all the way down to where the sound is virtually just a square-waved “blip” before gradually dialing back up to find a cool final setting. You might find a truly unique glitchy squawk that can be resampled for layering with drums for extra bite or time-stretched or massively reverbed into an original drone or pad instrument. Remember that distortion can be most effective when used as in “parallel”. Just as with parallel compression, this is when you mix the effected signal with the original, and enables you to dial in much more extreme distortion settings while retaining the relative definition and dynamic range of the unaffected sound. Distortion does not have to be applied to the source sound directly. Try adding distortion to effects sends such as delay and reverb: this will help further separate the send effect from the original sound, and provide a distinctly different character. In addition to the above, always consider where distortion will go in the effects chain order for your sound design processing. Whether you place some saturation, aggressive fuzz, or digital crushing before or after the delay, chorus, pitch-shifting, reverb, phasing or anything else in your processing chain, can dramatically change how all of the plugins interact with the source sound and with each other. Play around with reordering your chains for some interesting variations on your favourite processing combinations. Distortion comes in many different flavours, from tape and tube saturation to guitar amp simulations, solid state circuits and models of lo-fi digital hardware. And not every plugins interpretation of “tape distortion” will have the same colour or character; some plugins and settings will be just the thing for your drum sounds, others for parallel processing synths or saturating complete sub-mixes of designed layers to help tie them all together. Below are some of the best options available, my personal favourites for sound design work, for you to try out and discover what works best for your style and methods.
The Best Distortion Effects Plugins For Sound Design: Roundup List
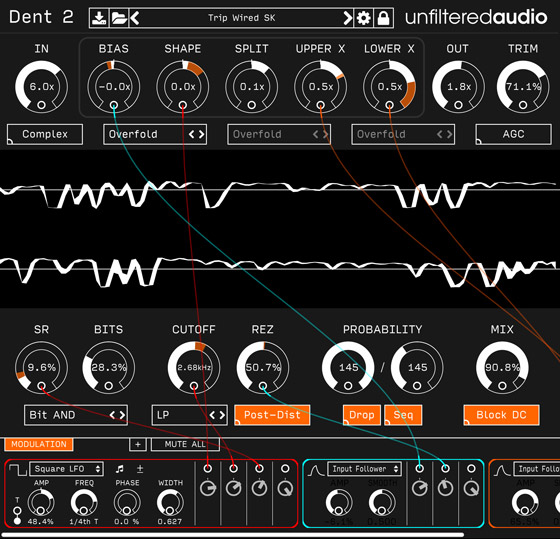
1) Unfiltered Audio Dent 2
With 10 different distortion or “Clipper” modes that run the whole gamut of distortion types and characters — Hard/Soft Clip, Wavefold, Overfold, Harsh Fold, Distortion, Tube, Tape, Gloubi, & Cubic — not to mention 6 distinct bit-crushing algorithms, Dent 2 is the stuff of a sound designers fever dream. Yes there are a lot of advanced features which may be overkill for less expert users, but get your head around these and you’ll be able to exert a ridiculous amount of control over how you distort and modulate your signals. And even with the number of options available, Unfiltered Audio plugins seem designed to enable and encourage the user to experiment without overwhelming you. And if all else fails, just keep hitting the Randomize Preset button: perfect for sound design sessions where generating happy accidents is part of the fun and often where the beginnings of the best ideas and sounds come from. Plus with every purchase of Dent 2, you also get its little brother, Indent. Check out the video below which nicely explains the differences and key features. Available for: Mac, PC | VST2, VST3, AU, AAX [button link=”https://www.plugin-alliance.com/en/products/unfiltered_audio_dent_2.html” target=”_blank” preset=”blue” text_color=”#ffffff” color=”#238bcd”]BUY NOW[/button] via Plugin Alliance.
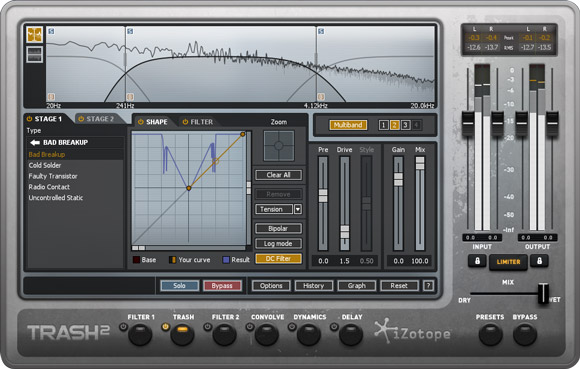
2) iZotope Trash 2
While not every great plugin is necessarily a “must-have” for everyone by any means, iZotope’s Trash 2 is one of a few plugins of any type that we consider virtually compulsory for any self-respecting sound designer. Why? It’s supreme versatility. Whether you’re going for lightly saturated “burnt edges” or you want to set your sound on fire (metaphorically-speaking), Trash 2 can be the sonic equivalent of a warm hug or a can of gasoline. Like most of iZotope’s plugin tools, it takes a fairly novel approach to GUI, feature set and workflow, featuring a series of switchable filters, multi-band dynamics, wave shapers, LFOs, envelopes, and even delay alongside the distortion algorithm sections. It’s a bit like having a channel strip plugin dedicated to distortion, which is perfect for developing and easily managing distinctive multi-stage distortion treatments within a single interface for sound design projects. The Preset category names give you a pretty good idea of the range of possible mangling: from Subtle and Utility to Percussive, Heavy, Aggressive, Classic Textures, Edge and Experimental. Available for: Mac, PC | VST2, VST3, AU, AAX [button link=”https://www.pluginboutique.com/products/438″ target=”_blank” preset=”blue” text_color=”#ffffff” color=”#238bcd”]BUY NOW[/button] via Plugin Boutique.
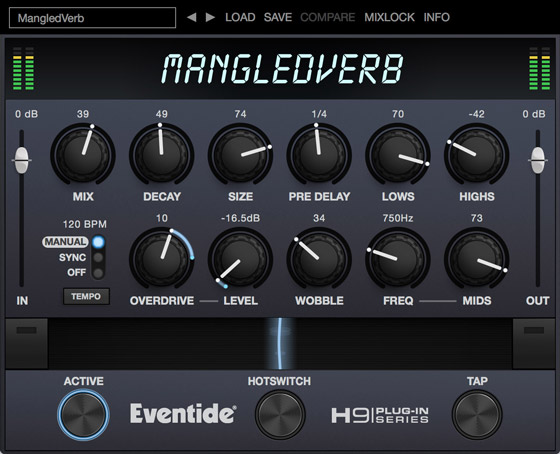
3) Eventide MangledVerb
Like their awesome Blackhole reverb plugin, MangledVerb is based on a specific preset configuration from one of their hardware effects units, in this case the H9 Harmonizer (and also the Space reverb stompbox). MangledVerb is at its core a reverb plus distortion algorithm, but the range and malleability of the effects goes far beyond that simple description, enabling some very original sounds to be created with relatively few tweaks. All of the controls are presented for maximum speed and effectiveness, and the standout performance feature is the Ribbon control, a sweepable section across the bottom of the plugin GUI that can be used to manipulate multiple parameters at the same time — always a surefire way of coming up with dramatic and dynamic sounds with plenty of movement and liveliness. Available for: Mac, PC | VST, AU, AAX [button link=”https://www.pluginboutique.com/products/3909″ target=”_blank” preset=”blue” text_color=”#ffffff” color=”#238bcd”]BUY NOW[/button] via Plugin Boutique; also available as part of the Anthology XI bundle.
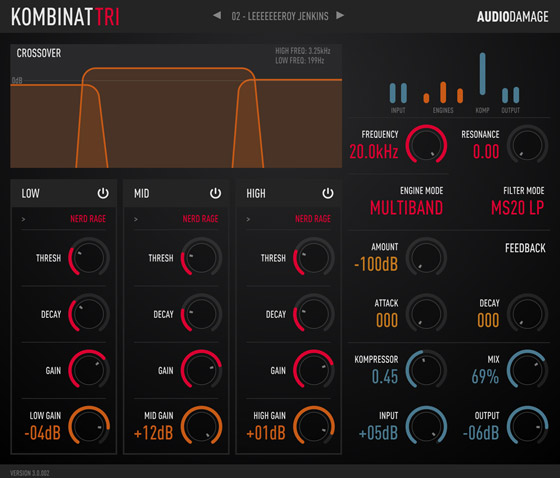
4) Audio Damage Kombinat Tri
As referenced in the intro tips and as you’ll notice from the selection of plugins in this article, being able to apply distortion to individual frequency bands — having “multi-band” operation — is one of the most useful aspects of a great distortion plugin for sound design purposes. Kombinat Tri has three bands (hence the name), and a clean, high-contrast and inspiring GUI that makes it easy to work with quickly and effectively. While it might not have quite as many bells and whistles as a Trash or Saturn, there’s a lot to be said for a relatively streamlined approach to multi-band processing, and in its price range it’s completely unbeatable for quality sound results and its ability to send your sounds off in unexpected and inspiring directions. Also see: Grind, also from Audio Damage, is a wavetable distortion processor that will really put your sounds through the proverbial wringer. Available for: Mac, PC | VST, AU, AAX [button link=”https://www.pluginboutique.com/products/4644″ target=”_blank” preset=”blue” text_color=”#ffffff” color=”#238bcd”]BUY NOW[/button] via Plugin Boutique.
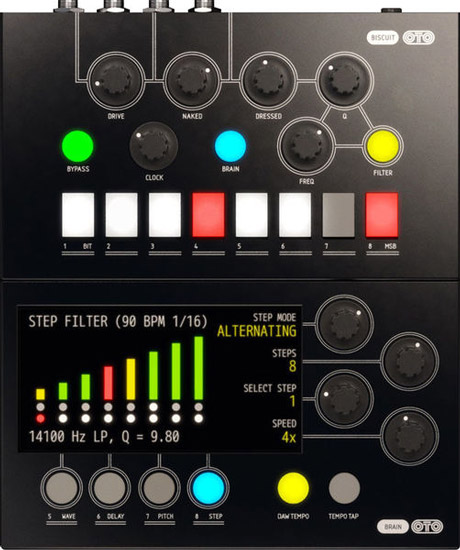
5) Softube OTO Biscuit 8-bit Effects
Softubes plugin emulation of the highly-prized OTO Machines Biscuit hardware digital bit-crushing box is available for both UAD and native plugin formats, so everyone can now get hands-on with what was quite a limited run of the original unit. The top section is the distortion module, featuring Drive and Clock controls and eight buttons that literally represent each of the eight “bits” that you can toggle on/off to change the character of, or “Biscuit”, the crushing effect. The distortion can get pretty wild with this configuration, so the distortion module also features a resonant multimode filter model, inspired by the Korg MS-20 filter, that is amazing, very rich and authentically “analogue”. In the lower module, you can engage one of four “Brain” effects: Wave Shaping, Delay, Pitch Shifting and Step Filter. With these relatively simple controls, it’s a great intuitive performance tool — it was initially developed primarily for DJs and electronic music performers — and this also makes it perfect for designing unique processing and effects on the fly. Available for: Mac, PC | UAD, VST2, VST3, AU, AAX [button link=”https://www.pluginboutique.com/products/4480″ target=”_blank” preset=”blue” text_color=”#ffffff” color=”#238bcd”]BUY NOW[/button] via Plugin Boutique.
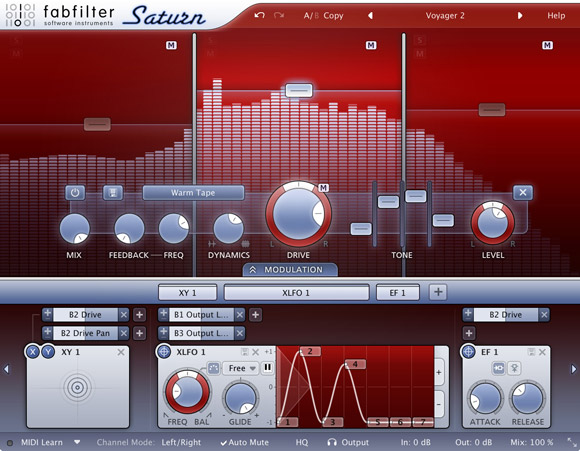
6) Fabfilter Saturn
Possibly the most flexible distortion plugin on our list here, Saturn combines many of the features we’ve already discussed above in the signature Fabfilter interface that makes the processing as simple, complex, fast, or detailed as you want to be. While the character of the sounds we generate with Saturn is distinct, like any great processor or instrument, the audio quality of the results is also second to none. With completely flexible multi-band operation, you can create as many separate bands and modulation sources (XY pads, XLFOs, multi-stage Envelope Followers and Generators) applied to as many different parameters as you feel the need for. The available distortion Style algorithms range from familiar Tape, Tube and Amplifier models, to more overt creative effects styles like Smudge (a stuttering-stretching effect) and aptly named Destroy. Recommended. Available for: Mac, PC | VST, VST3, AU, AAX [button link=”https://www.pluginboutique.com/products/925″ target=”_blank” preset=”blue” text_color=”#ffffff” color=”#238bcd”]BUY NOW[/button] via Plugin Boutique.
Stay tuned for the next parts in this series for many more tips and inspiration.
- Part 1 – Delay
- Part 2 – Distortion
- Part 3 – Layering
- Part 4 – Classic Modulation FX
- Part 5 – Stereo & Panning FX
- Part 6 – Pitch Shifting
- Part 7 – Reverb
- Part 8 – Step Sequencers & Envelope Generators
- Part 9 – Creative Filtering
- Part 10 – Granular Synthesis & Sample Processing
For more distortion plugins and inspiration, also check out our articles on 5 Of The Best Guitar Amp Sim Plugins And How To Get Great Tone With Them and The 10 Best Creative Filter Plugins In The World. Several of the plugins featured in this article are also part of some of the Best Music Production Plugin Bundles. And as ever, leave a comment below with your favorite sound design techniques and effects, and the tools you use to create them!
For a definitive collection of tips and techniques for enhancing your music to a professional level – from advanced compression techniques to shaping and placing your sounds in the mix with correctly applied reverb and fine-tuned EQ adjustments – don’t forget to check out our Ultimate Guides ebook series:  If you liked this post, you’ll definitely find these useful too:
The 10 Best Creative Filter Plugins In The World
5 Of The Best Guitar Amp Sim Plugins And How To Get Great Tone With Them
10 Ways To Make Your Soft Synths Sound More Analogue


1 Comment
Thanks